I recently had a student ask about stitching stands, and it was quite a lengthy response! There are so many things to consider, and I thought it might be good to share in general. Of course there are others who have commented, blogged about, reviewed, etc., but in case you didn’t see any of those, it bears repeating.
Stitching frames can be quite elaborate and expensive, or simpler and less expensive. It mostly depends on your stitching style and where you are the most comfortable.
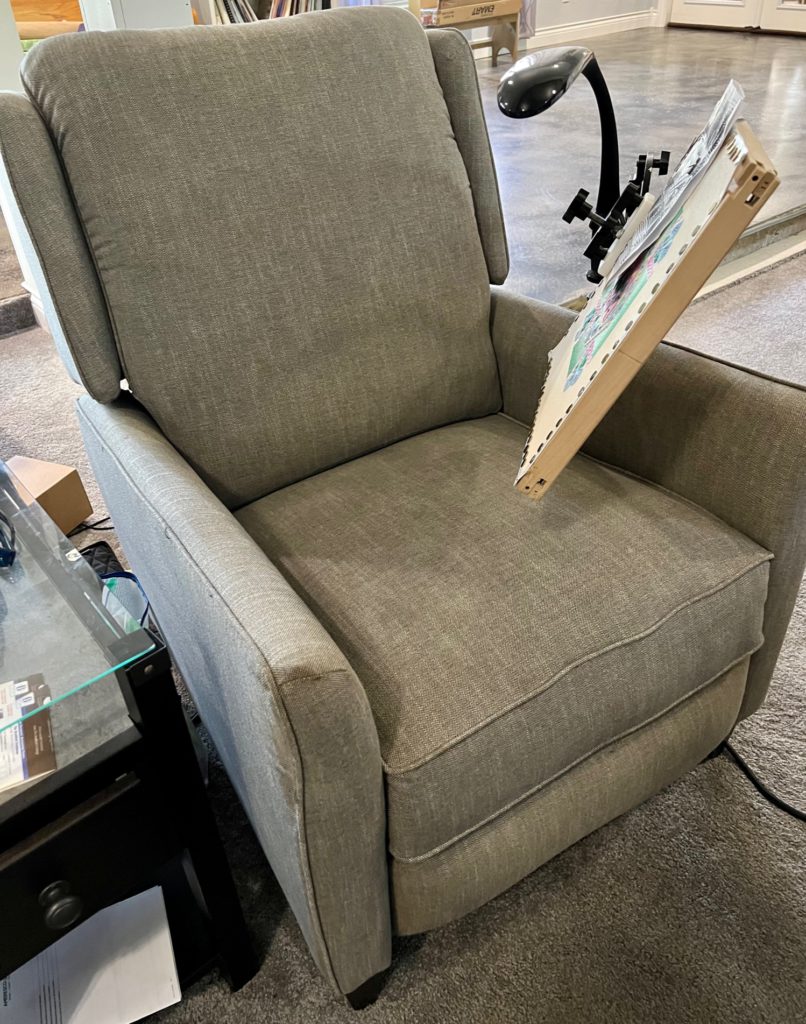
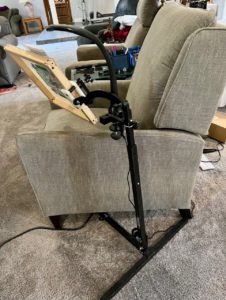
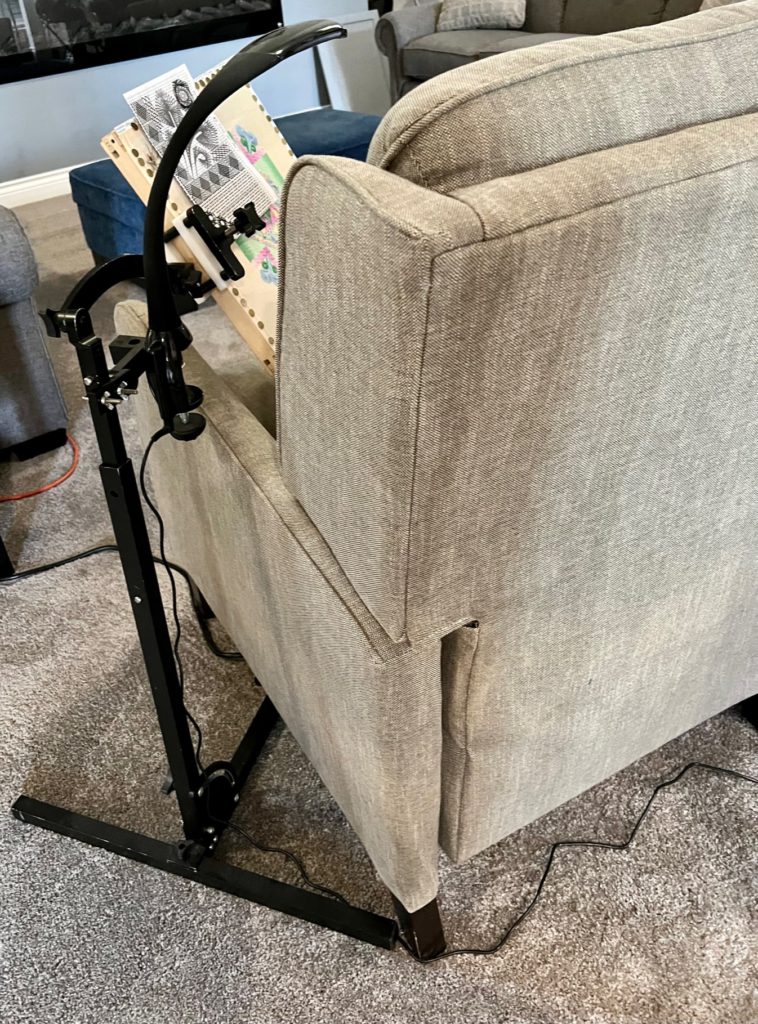
For instance, I stitch while sitting in a recliner. Most stitching frames will not work with a recliner due to the way the base of the stitching frame, and the base of the recliner, need to interact. Reclining rockers have a flat base that sits on the floor, and you can’t get the bottom of a stitching frame up under it. I remember buying a recliner once, and crawling around on the floor in the showroom with a measuring tape, to see how the recliner base sits on the floor, so I would know how my stitching frame would get under it! I’m sure the salesman thought we were nuts. Anyway, the one we bought had to sit on supports, raising it off the ground about 3″, so we could get the stitching frame supports under it. But I digress.
So first of all, examine how you like to stitch, where you are the most comfortable. What you want in a stitching frame will depend on your own stitching comfort and situation.
After deciding how you like to stitch, start exploring options, and there are several.
All of these options are assuming that the canvas is mounted on stretcher bars. Most of the stitches I use for counted canvas need the support of a tightly stretched canvas, and won’t lay properly if stitched in hand. Stretcher bars can be thinner or thicker; my preferred stretcher bars are Evertites, which are quite thick and somewhat heavy to hold in hand, but they do keep the stretched canvas as tight as possible. You can use a scroll frame, but in my personal experience I cannot get or keep the canvas tight enough for my satisfaction.
Stretcher bars with a tightly stretched canvas really do make the stitching easier, because you aren’t dealing with movement by the canvas as you bring the needle up and down for stitches. It will also make it much easier for your framer/finisher, since usually canvases stitched on stretcher bars don’t need to be fussed with as much to get them straight before framing or finishing. So stretcher bars are the first step. It doesn’t matter if you have the canvas on top of the bars or under the bars (stitching in the ditch or well), that’s a personal preference. But tightly stretched with stretcher bars, that’s a must. Tacks or staples are also a personal preference, but whatever you use, place them no more than 1/2″ apart.
OK, so now you need something to hold your stretcher bars as you stitch. A stitching frame allows you to use both hands for stitching and laying threads. I usually have one hand on top of my canvas, and one hand under my canvas, and it allows me to stitch quite fast. Plus, it eases shoulder strain from having to continually move one hand over and under the canvas. My hands and arms usually remain relatively still while I’m stitching using this method.
For stitching frames, there are table top models, lap stands and floor stands generally. I have, and use, all types, depending on my stitching situation. If you plan to travel a lot with your stitching, a table top or lap stand may be the most economical option, and you can use them at home as well. If you mostly stitch at home, a floor stand would probably be the best option.
Before we get into the stands, let me mention another option. If you stitch while sitting at a table, you may consider the cheapest option – quick release clamps from the hardware store, or frame weights. Quick release clamps come in a multitude of lengths. Usually you don’t want the smallest, but you also don’t need the largest. The ones I use are in the $15-$20 range for one, and you need 2 optimally. To use them, place your stretcher bars on the table, with just the top edge of the bars resting on the table. Put one quick release clamp on each side, holding the stretcher bars to the table. Now you can stitch hands free, but a word of caution, if you are very tall this will not be a comfortable stitching position because you will be somewhat hunched over. But they work fine in a pinch, are inexpensive, easy to travel with because they are light weight and flat, and I’ve used them while stitching at retreats and seminars.
Frame weights work somewhat the same way. A frame weight is a heavy object, placed on the top edge or top corners of the stretcher bars on the table. This will also hold the stretcher bars relatively flat to the table, and still, allowing for both hands to be free for stitching. These can also be elaborate or simple, they just need to be heavy, 1-2 pounds each.
Now on to the table models. A table model will sit on the table, with the clamping device holding the stretcher bars. These are comfortable for me, but will be very uncomfortable for shorter people. You can also put the table model bases on your lap, to bring the canvas down a bit. These usually travel pretty well if that’s a concern.
I’m most familiar with System 4 table stands:
System 4
They also have floor stands, table clamps and travel stands (I have all of these). Note that these are very expensive, an investment in stitching ease and comfort, but expensive.
Another brand is K’s Creations:
K’s Creations
I’ve had these as well, but note that the clamping device usually will not open enough for Evertites.
These are not as expensive, and the clamping device (I think) is interchangeable with the floor stand.
Both System 4 and K’s Creations have floor stands as well, just explore a bit on the above links.
If you know for sure you want a floor stand, you can also check out Lowery Workstands:
Lowery Workstands
As an added bonus, these now come in 12 colors!
In my personal experience with System 4 and with K’s Creations, they will repair the clamping devices if needed, no charge (just shipping). I’m not sure about Lowery because I’ve had very limited experience with these.
In looking at all of these, keep in mind:
1. How will I be stitching (recliner, couch, table, etc.)?
2. How will the base of this stand fit with my situation?
3. Will I be traveling with my stitching (may want to consider a travel stand, table clamp or table stand instead of floor stand if funds are limited)?
The best way to really look at these is to try them out in a needlework store, or see if a friend has one that you can test drive. All of them are good and have advantages and disadvantages. And I’m sure there are others that may work as well.
Good luck, carefully consider your own situation, and I’m hoping the wider needlepoint community will share their own experiences.
Debbie
1 thought on “Stitching stands, and how to choose one”
Debbie, Pictures are great. I have read many good reviews of System 4 stands. Thank you.