Well, not really, but I do like waffles for breakfast! And for dinner! Today’s post is about that wonderful waffle stitch. This is one of my favorite stitches of all time. I love the way it looks finished, I love its versatility and I love the way it can be varied.
First let’s address a terminology issue: what’s the different between a waffle stitch and a Norwich stitch? To be frank, none that I can tell, other than a difference in the name. So with that out of the way, let’s get into the basics of a waffle stitch.
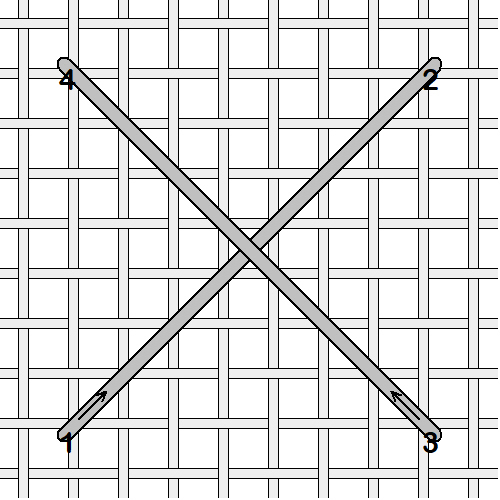
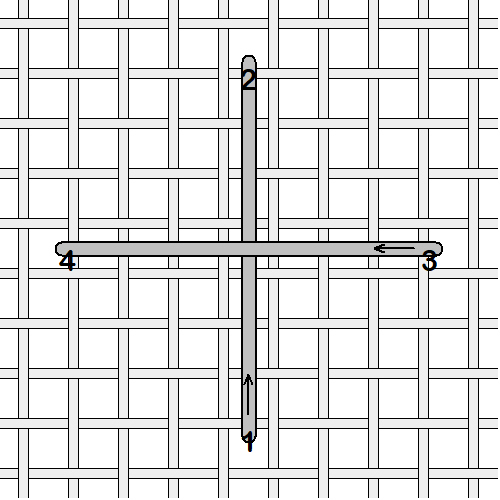
A waffle stitch begins with a base stitch that defines the outer points of the finished stitch. For a square waffle, that’s a large cross stitch. For an upright waffle or diamond waffle or waffle on point, it’s a large upright cross stitch.
Base stitch of a square waffle. The finished stitch will cover 8 canvas threads in a square shape.
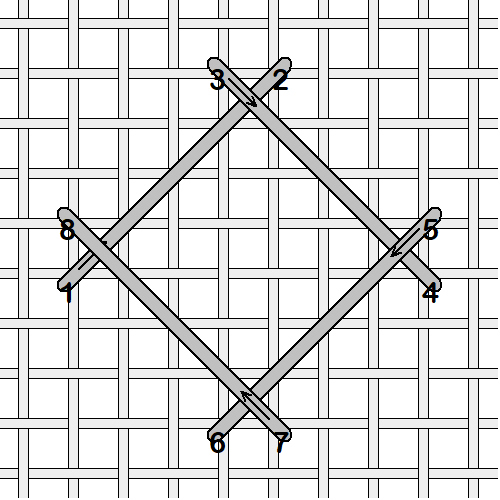
Base stitch of a diamond waffle. The finished stitch will cover 8 canvas threads in a diamond shape.
With the base stitches established, it’s time to fill in the square or diamond. The interesting thing about a waffle stitch is that all of the thread carries form an open shape on the back. The needle travels in a straight line, without crossing any threads on the back, from where one stitch ended to where the next stitch begins.
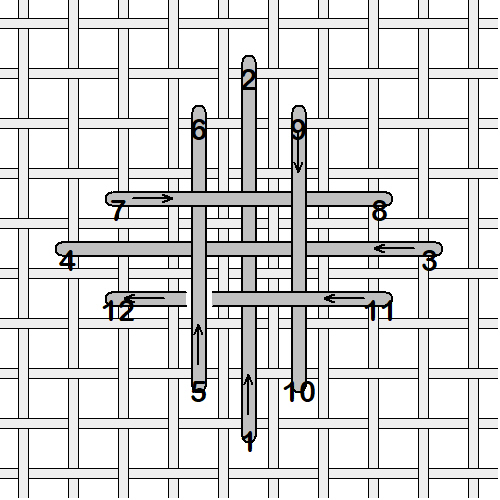
Take a look at the finished waffle stitch:
You will see that following the numbers, the thread carries will form an open square on the back. From the end of the second stitch, at 4, the needle travels in a straight line to 5 to begin the next stitch. From the end of that stitch, 6, the needle travels in a straight line to begin the next stitch, 7. From the end of that stitch, 8, the needle travels in a straight line to begin the next stitch, 9. From the end of that stitch, 10, the needle travels in a straight line to begin the next stitch, 11. The thread on top of the canvas lays next to the base threads, with each round expanding out.
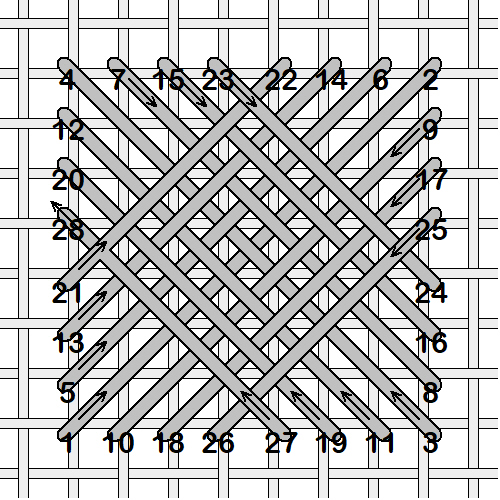
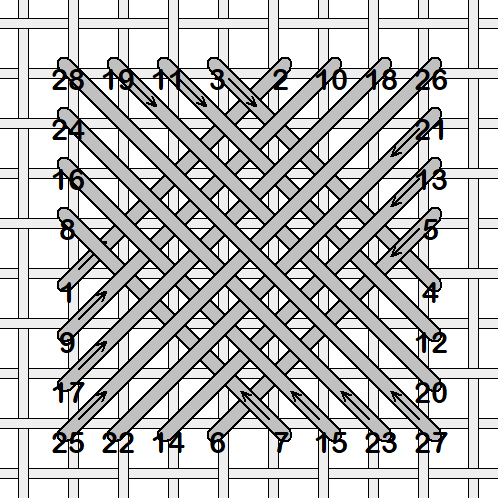
Now let’s look at the diamond waffle:
The thread carries here are forming an open diamond shape on the back. From the end of the second stitch, at 4, the needle travels diagonally to 5. From the end of that stitch, 6, the needle travels diagonally to 7. From the end of that stitch, 8, the needle travels diagonally to 9. From the end of that stitch, 10, the needle travels diagonally to 11. The stitches all lay on top of the canvas next to the base threads that formed the upright cross.
Because of this nature of the stitch, with the thread carries forming an open shape on the back of the canvas, this is the perfect stitch for overdyed threads because most of the color changes will be on top of the canvas. It’s also wonderful for expensive threads like silk or specialty threads, because most of it is on top of the canvas. And because most of the stitch is on top of the canvas, it’s a very flat textured stitch, which makes it a wonderful border stitch for more highly textured areas.
One little thing needs to be mentioned to make your waffle stitches perfect. The last stitch of the waffle stitch slides between the canvas and the first stitch of that round before ending. This puts one thread on top of every thread all the way around, giving the waffle stitch a more complete and finished look. In the example of the square waffle stitch, the last stitch is 27. It slides under the first stitch of that round, 21, before ending at 28. For the diamond waffle, the last stitch is 11, and it slides under the first stitch of that round, 5, before ending at 12.
The waffle stitch is stitched in rounds, which makes it perfectly easy to stitch it with multiple colors or threads by alternating the threads used in the rounds:

In this example, yellow was used for the base stitches and the first round. White was used for the second round, and turquoise was used for the last round. Bigger waffles mean more options!
On a final note, a reverse waffle is also very interesting. It is stitched in reverse, beginning with the base stitches:
The rule still applies that the needle travels in a straight line from the end of one stitch to the beginning of the next stitch, but it ends with the large cross stitch that would have been the beginning of a regular waffle:
For a reverse waffle, you don’t slide the last stitch under the first stitch of that round, just let it lay on top. I like this stitch with a single strand of cotton or silk floss, or a very fine metallic braid, to show the structure of the stitch through the threads.
I hope you found this tutorial on waffle stitches instructive, and that it will help you stitch faster because you understand the structure of the stitch!