I apologize for not getting this up on “Stitch Along Monday”. I have been completely overwhelmed by the response to my class through Shining Needle Society, Adagio, and spent yesterday (the deadline for registration) handling all the administration necessary for an online class. Whew! Now I can concentrate on other things, like fun stitching!
Click for here for Harlequin Dance Redux instructions Part A
The Harlequin Dance Redux is a small design composed of several different areas. The first area is in the upper right corner, a series of four waffle stitches that share holes. Yes, waffle stitches again! It’s one of my favorite stitches so I use it a lot.
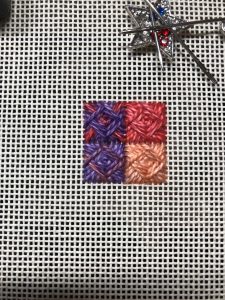
This time I’ve stitched it using an overdyed heavy cotton. In my stash I had a card of Rainbow Gallery Overture, V26, a color which has unfortunately been discontinued. Let me emphasize that this was in my stash. One of the best parts of stitching is shopping for threads for new projects, whether it’s shopping in your stash or in an actual shop. I would encourage you to find colors that “sing” to you to devise your color palette – your favorite colors, colors that make you happy, color combinations from your favorite blouse or dress, flower colors – you can find color inspiration anywhere. So don’t despair if you can’t find the same colors I’m using – just about any color combination will work, including a monochromatic scheme.
So, I separated the cotton into 4 strands, about 42″ long, and it wasn’t quite long enough to stitch all four of the waffle stitches. You may choose to use a longer length. It’s not going through the canvas like a small stitch would, which causes the thread to degrade, so you should be safe using a longer length.
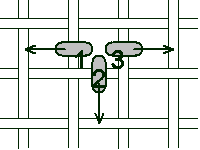
I anchored with a pin stitch in the shape of a “T”, about 3″ from the upper right edges of the canvas. I cut my canvas allowing 3″ margin all the way around, because I find it allows plenty of room for anchoring threads. Also, if I’m a little bit off in my placement of the first stitches, there’s plenty of room for the design to come and I don’t have to worry about being too precise.
After anchoring I stitched the first waffle stitch, beginning with a large cross stitch over 8 canvas threads. From there I continued around the square shape, bringing the needle up at the odd numbers and down at the even numbers.
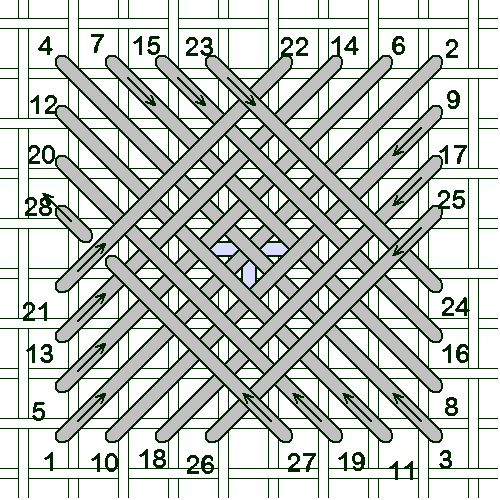
Notice that for the last stitch, I slid the needle between the canvas and stitch 21, so that the last stitch would also have a thread on top of it like the others. I had thread in my needle so I continued with the remaining waffle stitches. In the diagram for the first waffle stitch, you can see the “T” stitch is covered by the stitches of the waffle stitch.
The waffle stitches all share holes with each other.

To end the threads, I gently separated the threads of a waffle stitch until I could see a canvas thread clearly. I made a pin stitch over the canvas thread, stitching twice over the same thread. Then I pull the thread up to put some tension on the thread, and snip it off as close to the stitching as I can. The tension on the thread pops it back into the stitch. If the idea of this makes you nervous, you can snip it off on the back side of the canvas. After making the pin stitch, I stroke the threads of the waffle stitch back into place.
That’s it for today. I hope to do better with my timing next week!